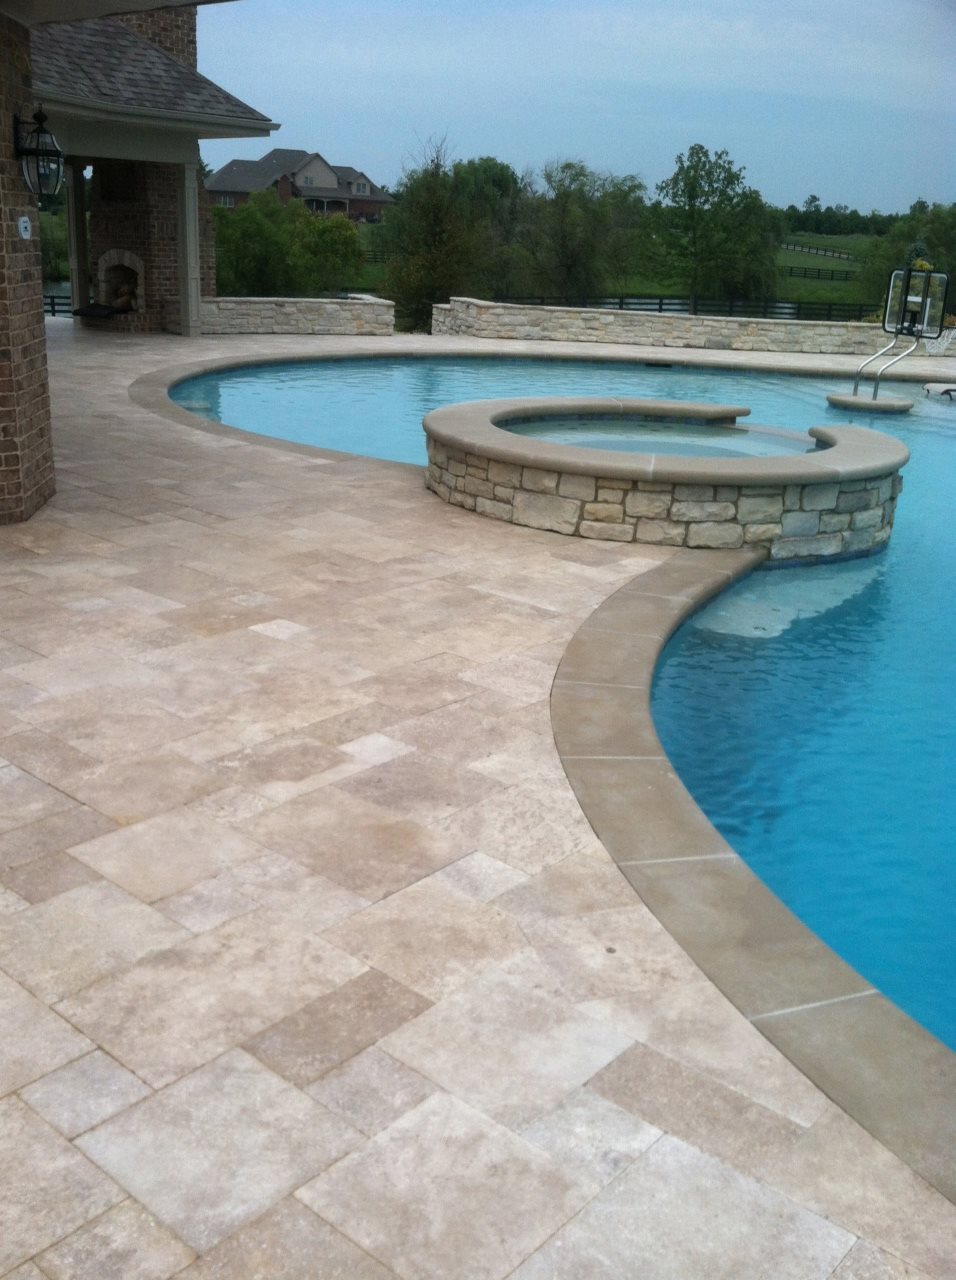
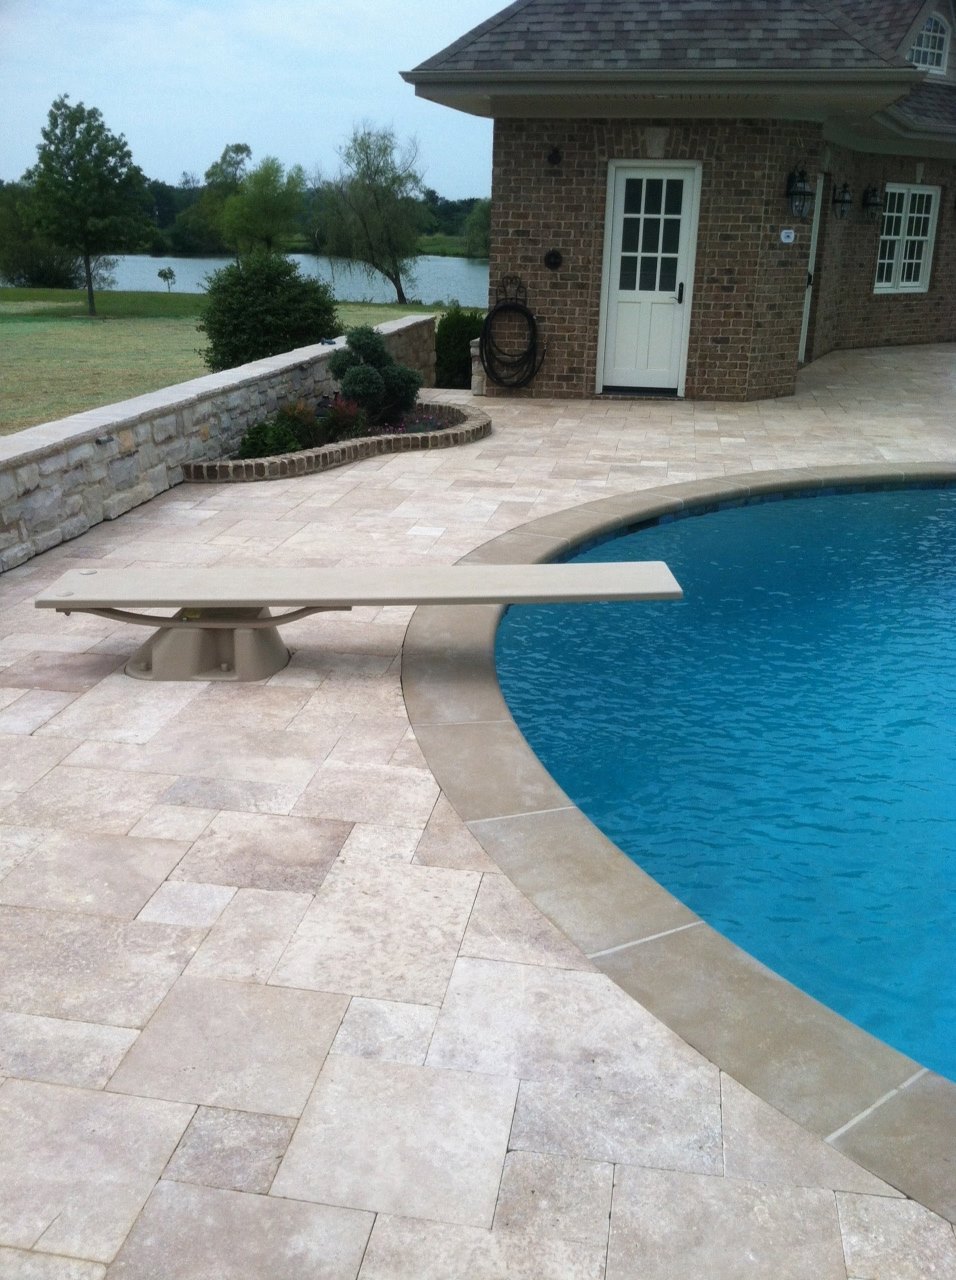
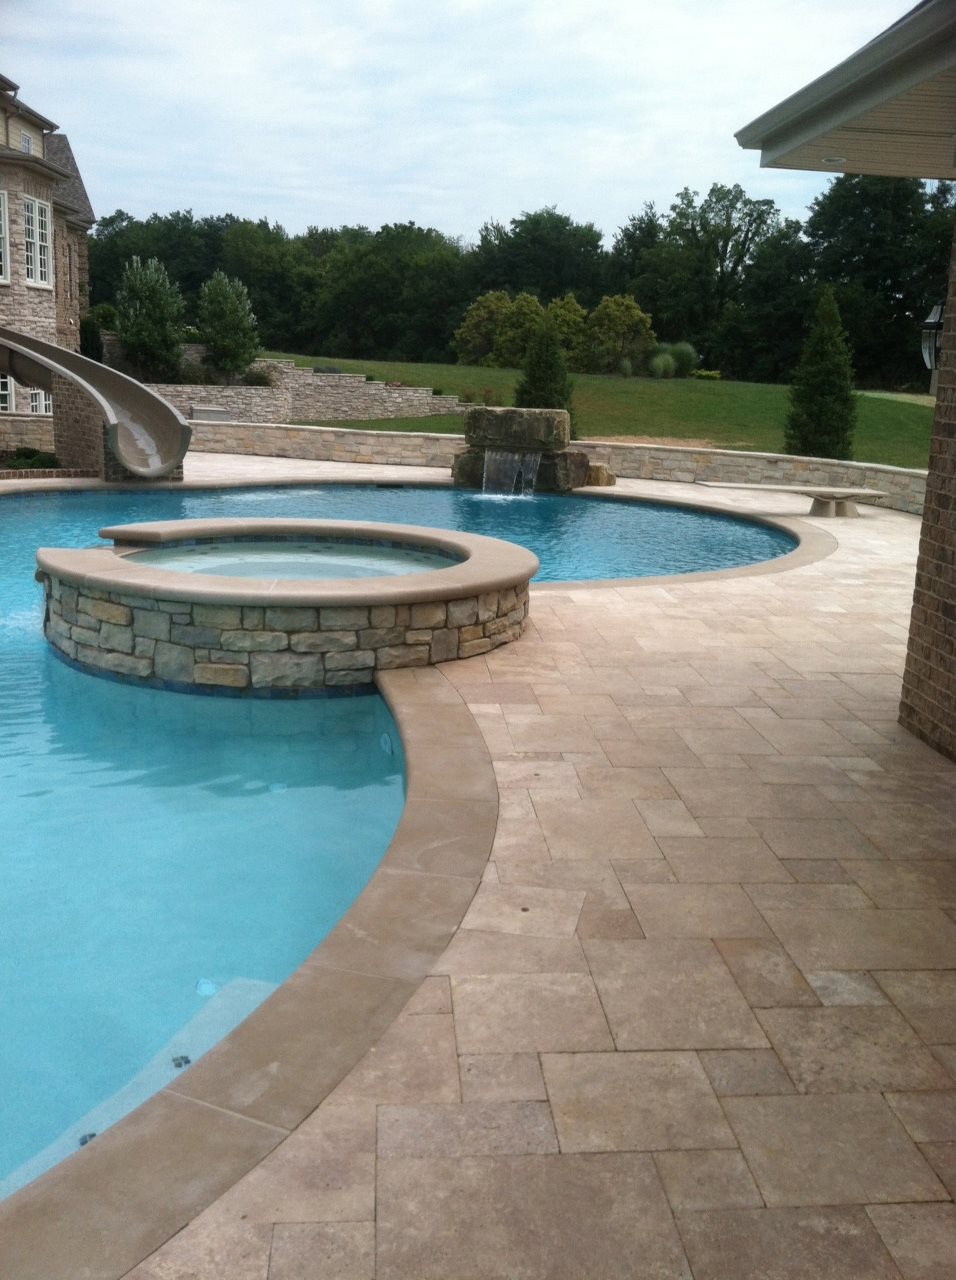
This is a custom gunite pool project that we really enjoyed working on. The travertine pool deck turned out great. This inground swimming pool project is complete with custom limestone coping, a custom water slide, pool house, spa, outdoor fireplace, boulder waterfall and more.
We’re planning to take some more pictures this spring 2014 and we’ll upload them as soon as we have them. For now, here’s what we have.


The Power Of Properly Installed Proper Paver Edge Restraint
Probably one of the most important aspects to a long lasting paver patio is the paver edging. Keeping the edges of pavers contained is crucial to maintaining interlock between the pavers. Part of how pavers achieve interlock is by the course sand setting bed being forced into the joints of the pavers, if the pavers aren’t restrained around the perimeter, the pavers will separate over time causing a loss of interlock in the joints.

Common Problems/Failures in Plastic PVC Paver Edge Restraint
Black Paver Edging Popping Up
As you can see in the picture below, the paver edging wasn’t installed correctly and as a result the edge pavers are moving away from the rest of the pavers.
I’ve mentioned in previous articles that I also own a company that specializes in the repair, cleaning and sealing pavers and one of the most requested repair’s we do is fixing edging that has raised up.

Brick Edge Restraint and Border Pavers Shifting

As you can see in the picture below, the paver edging wasn’t installed correctly and as a result the edge pavers are moving away from the rest of the pavers.
How to install paver edging
OK, so we agree that paver edging is important and it must be installed correctly. There are 3 very basic steps that you must follow to guarantee that your paver patio, walkway or driveway will last and you won’t have issues with your edging popping up over time.
I’ve created a very handy installation guide and video that shows you step by step how to properly install edging like a pro.
In addition to the installation guide, I’ll also show you a specific paver edge restraint that we use on all our projects. This edge restraint is the only one of it’s kind due to a patent. If you use this edging, it’s nearly impossible for your edging to pop up over time. It can be a little difficult to find, and most paver suppliers do not carry this style of edging. If you have trouble locating it, I’m happy to sell/ship you out what you need.
In addition to the patented edge restraint, I’ll also share with you the best paver spikes to use. The spikes we use are designed to stay in place after installation due to their ribbed sides. Most spikes have smooth sides allowing them to easily slide out after installation. We can sell/ship these out with your edging too.
If you’re planning to build your paver patio yourself, you’re likely spending well over $1,000. For $20, you can rest assured that one of the most critical aspects of your installation was done like a pro. As I said above, edge restraint repair is one of the most common repairs we do.
Get the Guide Now
Paver Edging Repair
If you’re like so many others who have paver edging failures, you’re probably very frustrated. In our guide, we’ll also show how to fix your paver edge restraint. On 95% of our edging repair jobs, we replace the existing edging with new edging that’s designed not to pop up over time and install our new spikes.
How to Install and Repair Paver Edge Restraint Guide: Click Buy Now Below
[one_half]
[/one_half]
[one_half_last]
[/one_half_last]
Leave us a comment!
Over the past few years, polymeric sand and joint stabilizing paver sealer has become more and more popular. At Two Brothers Brick Paving, we prefer to use a joint stabilizing paver sealer over polymeric sand whenever possible. For the most part, they achieve similar results in the joint – keeping the sand in tact. In this article, I’m not going to discuss the pros and cons of paver sealer vs polymeric sand (I’ve already done so in an earlier article on polymeric sand), instead I’m going to share with you how to properly install paver sealer. Note that our sister company, Perfect Paver Co, offers paver sealing in Dayton, Ohio.
Step 1. If you’re sealing a paver patio that’s been down for sometime, you’ll want to make sure and remove all vegetation growing in the joint. This can be done usually by pressure washing with a high psi pressure washer. You should be able to blow the vegetation right out of the joint.
Step 2. Clean the pavers. Almost always, we recommend pressure washing pavers before sealing. It will require that you do step 3, however, it will achieve the best end result. Using a 3500 psi pressure washer and a fan style tip, take your time going over every square inch of the pavers. If needed, go back over a second time. Just make sure to hold the pressure washing wand about 8″-10″ away from the pavers because if you get too close you can cut grooves in the pavers. Again, make sure you’re using a fan tip and not a jet tip. If you have rust stains or any other stains that won’t come out, try cleaning with a general purpose cleaner sold by Surebond.

Step 3. After the pavers have dried for at least 24 hours in direct sunlight (may take longer in shaded areas or cooler times of the year), you’re ready to re-install the joint sand.
Advanced Version: We recommend that you fill the joints with the same course sand that was used for the setting bed (what the pavers are laid on top of) to fill up the joint. This can be difficult to do without a vibratory plate compactor as the size of the sand is a bit larger than most paver joints. The vibratory plate compactor will vibrate and force lodge the sand into the joint. Most gravel distributors will carry this sand; they call it concrete sand or course sand. You will need about 1- 5 gallon bucket of this sand per 100-200 square feet of pavers. You’ll want to evenly spread the sand out over the patio covering every square inch. We use a base rake but you can use a push broom. Take the top of the broom and put it one the pavers creating a plow affect. Push the broom around upside down going back and forth over the pavers until the sand is evenly spread over all the pavers (about 1/8″ thick). If your sand is wet or damp at all, you will need to spread your sand out first so that the sun can dry it out. Then you will be able to broom it around easily to get the even layer.
Once the patio is covered with a consistent layer of dry sand, you’re ready to compact. Using a vibratory plate compactor, go over top of all the pavers. Spread the sand back out with your broom and go over them one additional time. Now sweep off the sand and the joints should be full. You’ll want to remove the sand so that the sand is just below the sharp edge of the paver aka the chamfer. For tumbled pavers that don’t have a sharp edge, we recommend that the sand be about 1/16″-1/8″ down from the edge of the paver. You can use a blower to achieve the desired level of sand in the joint. Blow off the patio very good when you’re done to make sure there are no particles of sand sitting on top of the pavers.

Simple Version: If you lack the tools and time needed for the advanced version, you can go about it this way and achieve a similar result. The only down fall is that the sand that you must use is smaller and can easily gets removed from the joints in time.
After you’ve completed step 2, you’ll need to get sand back into the joints. In this simple version, you can use mason sand or fine sand. Most Home Depots will sell bags of Quikrete Mason Sand in the same isle as the bagged concrete. You can also get mason sand from your local gravel company in bulk form. If you’re getting bags, you’ll need about 1 bag per 100 square feet. This sand is much finer and will fall right into the paver joints making it easier to fill the joints without the use of vibratory compaction equipment. Sweep the dry sand (must be dry and the pavers must be dry) into all of the joints keeping the sand about 1/16″ – 1/8″ down from the edge of the paver. When all of the joints are filled, use a blower to remove any excess sand sitting on top of the pavers.
Step 4. You’re now ready to apply the paver sealer. Just make sure that the pavers are 100% dry, the sand in the joint is 100% dry and there is no rain in the forecast for at least 24 hours. The paver sealer we use most often is made by Surebond and it’s called SB-1300. It’s a water based sealer that penetrates into the surface of the paver and also has the bonding additives that will harden the sand joint. You’ll need a pump up sprayer and a squeegee.
Fill your pump up sprayer with the paver sealer – do not dilute. Start spraying the paver sealer directly on the pavers at a rate of about 80 square feet per gallon. Once the paver sealer starts to pool in the joint, you’ll know you’re ready to move on. It’s best to have a second person running the squeegee. The idea of the squeegee is to pull the paver sealer from the top of the pavers down into the joints as you want about 75% of the sealer in the joints to fully harden the sand. Pretty much as soon as you start spraying, your squeegee person should start squeegeeing. If you we’re using a paver sealer that isn’t a joint stabilizing sealer, then you wouldn’t need to use the squeegee and you could pretty much just spray on the paver sealer with a much higher coverage rate.
Here is a video done by Surebond to show how its done. //www.youtube.com/embed/HZpnYnBAfd4
Best of luck with your paver sealer project. If you would like to speak with us about sealing your project for you, please don’t hesitate to contact us here. We offer paver cleaning and sealing services in Dayton, Cincinnati, and Columbus areas.
Have a question? Leave us a comment!
We we’re/are honored to be apart of this patio renovation project for The Winds Cafe in Yellow Springs, Ohio. Nadia Malarkey of Yellow Springs was the designer of the new space and it couldn’t have turned out any better. Since completion, the new patio receives many compliments on a daily basis.
Here are some pictures of the new patio.


We we’re hired by The Hospice of Dayton to design and build a monument for their retiring CEO. After a few variations, they decided this design which included a paver labyrinth to be perfect.
Here are some pictures of the project.


Note the custom cuts involved


If your organization is exploring the idea of a paver labyrinth and would like to speak with us regarding design, budget or any other questions, please don’t hesitate to contact us.
Curious what a labyrinth is? This should help:
A labyrinth is an ancient symbol that relates to wholeness. It combines the imagery of the circle and the spiral into a meandering but purposeful path. The Labyrinth represents a journey to our own center and back again out into the world. Labyrinths have long been used as meditation and prayer tools.
A labyrinth is an archetype with which we can have a direct experience. We can walk it. It is a metaphor for life’s journey. It is a symbol that creates a sacred space and place and takes us out of our ego to “That Which Is Within.”
Labyrinths and mazes have often been confused. When most people hear of a labyrinth they think of a maze. A labyrinth is not a maze. A maze is like a puzzle to be solved. It has twists, turns, and blind alleys. It is a left brain task that requires logical, sequential, analytical activity to find the correct path into the maze and out.
A labyrinth has only one path. It is unicursal. The way in is the way out. There are no blind alleys. The path leads you on a circuitous path to the center and out again.
A labyrinth is a right brain task. It involves intuition, creativity, and imagery. With a maze many choices must be made and an active mind is needed to solve the problem of finding the center. With a labyrinth there is only one choice to be made. The choice is to enter or not. A more passive, receptive mindset is needed. The choice is whether or not to walk a spiritual path.
At its most basic level the labyrinth is a metaphor for the journey to the center of your deepest self and back out into the world with a broadened understanding of who you are.
We are a specialty travertine paver installer. We install travertine pavers in Ohio. We also install in Kentucky, Indiana, and Michigan for projects over 1,000 sq ft and beyond for projects over 5,000 sq ft.
For travertine installation, Contact us here. If you’re looking to purchase high quality travertine pavers, click here.
Travertine is the perfect choice for any pool deck. In the last few years, we have been installing more and more travertine pavers around swimming pools which is an absolutely beautiful look.
Before 9/11/2011, 90% of travertine was imported from Italy and the price wasn’t as attractive as it is now. Soon after the 9/11 attack, President Bush dropped the Embargo with Turkey, gave Turkey 20 billion dollars and lowered tariffs (to have military based in Turkey). Now, almost all of Travertine is imported from Turkey and it’s cost is very attractive. You can also find travertine imported from Brazil and India, however, not only is it a lower quality we choose not to purchase travertine imported from these countries because they don’t follow child labor laws.


Why is travertine good for pool decks
Other than aesthetics, there are many other characteristics that make travertine great for pool decks; its resistance to heat, mold and that it’s slip resistant are just a few. The ADA (Americans with Disabilities Act) is a federal code that requires a static coefficient of friction of 0.05. Travertine ranges from 0.06-0.07. To put it into perspective, most concrete pavers rate a 0.07. It’s travertines dimples and cavities that makes it slip resistant. If you plan on sealing your travertine, we recommend that you use a water based sealer and only apply one coat.
Travertine Pavers are able to withstand cold weather conditions given that they have been properly installed and are premium grade. They are not only able to withstand freeze-thaw cycles but also extreme heat, their natural coolness provides an excellent walking surface for bare feet.
Travertine will initially cost more than concrete pavers. However, travertine will keep it’s color indefinitely, compared to other options like stamped concrete or even concrete pavers which will all fade in time.
Travertine Pavers are highly durable; they have been in nature for thousands of years and in freezing temperatures. It is the highest in compressive strength at over 17,000 psi; compared to stamped concrete which is typically 4,000 psi and concrete pavers which range from 7,000 psi – 10,000 psi.
Not all travertine is the same
Different grades
Premium Grade Travertine – This grade of travertine are selected to have consistent coloring throughout the crates, and the only limitation about holes (again this varies by producer) is either “no large holes” or “no holes/fill all the way through each tile.” They will also specify no chipped or cracked edges, and that the tiles/slabs be the same thickness throughout. It’s important to understand that the dimples and cavities in travertine is natural; you just want to stay away from excessive holes, especially the ones that go all the way through the stone.
Standard Grade Travertine – The definitions are similar to first grade, but each supplier uses looser language. They generally call for consistent color; one advertises “double-filling,” but doesn’t specify if the second fill is done by hand, as is done with their first grade of travertine. Large filled holes are allowed; some filled holes through full thickness allowed. This grade is typically what you will buy from most online suppliers even though they claim it to be premium grade because there is no published “official” documentation about grades of travertine therefore the grades are just a matter of opinion.
Commercial Grade –Wide light/dark color variation, with gray or black inclusions allowed. Defects in honing and sizing allowed. Small unfilled holes allowed; no hand filling, large filled voids allowed, non-stop holes allowed (from the bottom to surface). Cracked and broken edges permitted. Delivered without any color selection or sorting.
Typically, the cost of premium travertine delivered will run between $5-$6 per sq ft. Chances are, if you’re paying less than this than you’re probably not getting premium grade travertine. Be weary of the ‘Free’ samples. Often times online suppliers will sort out the best of the best and set those pieces aside for samples. If you’d like to know where we get our travertine, click here.
As you can see, travertine pavers are heat resistant, they won’t burn your feet in hot summer months, they absorb water to help prevent slips and also help prevent flooding – AND THEY ARE BEAUTIFUL especially around pool decks.
Travertine Installation
We offer an installation process that works with the climates found in the midwest. Since most of the travertine enters the US in Florida, most of the published installation procedures are based on that climate. If you’re interested in speaking with us regarding the installation of travertine around your pool deck, we would be happy to help. We primarily offer installation in the Ohio area (Dayton, Cincinnati, Columbus), however, we also often install outside of this area for larger projects (1,000 sq ft +). For larger projects we are able to travel to Michigan, Kentucky and Indiana. If you’re project is really large (5,000 sq ft +) we will consider traveling further.
Please contact us here for travertine installation.
If you’re looking to buy high quality travertine pavers, click here for our travertine supplier.
This is a project we installed for Zeiger Residence in Upper Arlington, OH (Suburb of Columbus, Ohio). The Zeigers had completely renovated the inside of their home and wanted to improve the backyard by adding a cozy fireplace area that was a separate space from the existing covered porch and brick patio.
We designed and installed a travertine paver patio with natural stone seating walls and a natural stone wood burning outdoor fireplace. This project was especially exciting because the home was going to be featured in the 2011 Kitchen Kapers Tour and Mrs. Zeiger (Merrit) is the honorary spokesperson for the organization. We we’re able to complete the project the evening before the event was to start.

The natural stone pathway with grass growing between each stone is made from Fond Du Lac stone which comes from Fond Du Lac, Wisconsin.


Here are a couple before pictures.


If you would like to see some progress pictures of this project, please visit this project on our Facebook page.
This is a project we just completed for a client that recently moved to the States from Argentina. When they purchased the house, the one area they weren’t fond of was the back patio. It was too small, had no character and they we’re able to entertain outdoor like they want. So they contacted us. We discussed some of the ways they planned and would like to use the space. With this information, we we’re able to design the perfect space using interlocking paving stones made by Unilock that resembled granite. We used a black accent paver around the perimeter of the patio to make the patio pop out. The built in grill island has a slide out door where the customer stores their propane tank.
After Completion


During Construction


Before Construction

Paver: Unilock Umbriano
Color: Midnight Sky
Accent Paver Border: Unilock Il Campo
Color: Dark Charcoal
Seating Walls/Outdoor Kitchen/Steps: Unilock Brussels Block Dimensional
Color: Limestone
Granite: Black
This paver project in Washington Courthouse, OH was a lot of fun and we really enjoyed working with this client. They struggled picking out material colors and choices so they told Mark the owner to pick for them. Needless to say the project turned out exceptional.
The client wanted a seperate space off their existing deck to lounge and enjoy a fire with their family of 5. Their house is the neighborhood hang out.


Paver: Unilock Brussels Block
Color: Sierra
Accent: Unilock Copthorne
Color: Burnt Clay
Seat Wall / Fire Pit: Unilock Brussels Block
Color: Sierra
Wall Cap: Unilock Brussels Block Double Fullnose
Column Cap: Unilock Ledgestone Pillar Cap
This project is located in Centerville in the Ashbury Meadows development. The client had a very outdated paver patio that didn’t integrate well with the architecture of the home so it wasn’t very inviting. We created a design that welcomed and made the hot tub more usable regardless of the weather.
Since installation, the client has contacted us letting us know how much they love their new patio and how many compliments they’ve recieved.

Progress Pictures


Before pictures


Pavers: Unilock Camelot
Color: River Blend